Sometimes a Space Marine player will have taken a single drop pod with his army, commonly with some kind of Melta unit inside. Sternguard are often the unit of choice, either 5 men with combi meltas or even 10, who then combat squad out of the pod and try to nuke two targets. Other common choices are "vanilla" dreadnoughts with Multimeltas (MM), Venerable Dreads for the BS5, or Ironclads for the AV13. Blood Angels players also like to drop 5-10x Jump Infantry with 2-3x Meltaguns on turn 2, and sometimes Furioso Dreads as well. There is a basic deployment technique called "Castling" or "Bunkering" that can severely limit the effectiveness of these units.
Let's refresh our memory of the rules for Deep Striking:
1. A mishap occurs if the Deep Striking unit does any of the following:
- They land fully or partially off the table
- They land within 1" of an enemy model
- They land on impassable terrain
- They land on top of a friendly model
And specifically for Drop Pods:
1. Half of the Drop Pods (rounding up) MUST enter play at the beginning of the controllers Turn 1, and the others arrive from reserve as normal, i.e. on a 4+ turn 2, 3+ turn 3 etc. This means you can often make a good guess what is coming and when.
2. A Drop Pod that scatters and consequently lands on an enemy model or impassable terrain will have the scatter reduced by the minimum number of inches required to prevent a mishap. This means that they must choose a legal landing site in order to prevent a mishap - reducing the scatter distance means exactly that, not "put it anywhere you like close to the target point so you're not touching anything". If they choose an unsafe landing point and either Hit or scatter insufficiently, they will mishap. They also mishap off table edges and land in difficult terrain (counting it as dangerous) as normal.
In this first post we will assume the enemy is dropping with normal meltaguns (6" for 2D6 Pen).
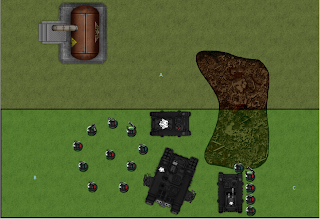
In this picture we have 10 tac marines, a Rhino, a Razorback with 5 more Tac marines and a Land Raider filled with Terminators. Obviously the Land Raider is the juiciest prize for the opponent, because those termies look a lot less scary walking 6" a turn instead of 12" + 2" disembark + Assault ramp.
The big Tac squad are doing the job of all non-essential infantry in these circumstances, which is to fill out as much space as they can. This restricts placement on the left to landing site B - which is outside of 6" from the Raider, and also puts the pod at severe risk of scattering off a table edge. An important aspect of their positioning is that they are all within 8" of the hatches of the Rhino, which means they can all embark next turn once the Pod threat is gone.
The Rhino is blocking access to the Land Raider, and providing it with a cover save if they try to drop in near landing site A. Of course the Rhino itself is vulnerable, but if they want to waste 2 KPs and over 100pts trying to kill a 35pt Rhino, they're welcome.
The Razorback is blocking access from landing zone C, and the disembarked squad are providing a cover save to their Razorback as well, reducing the risk of losing it.
The brown terrain blob is impassable (I know one of the Razorback squad guys is standing on it, my mistake!) so the pod cannot land on it, but can land past it with clear line of sight to the Raider, but at this point they are out of 6" so will need 6s to glance.
With a little bit of thought and careful placement, your opponent now has nowhere to drop so that he can threaten the Raider effectively, and you are only slightly inconvenienced, because both squads can embark on their vehicles and move off next turn, leaving the path free for your Raider to advance/assault.
No comments:
Post a Comment