So, 6th Edition Happened.
Needless to say, it changed a lot of how we play the game. To whit - random assault ranges, Overwatch, Flyers, random psychic powers, Fortifications, Hull Points, Allies etc.
How has this affected the game?
Well, it ranges from "Not much" to "I may as well be playing a different system" depending on your army and list. I'm going to keep looking at various aspects of the game, focusing particularly on the new Eldar release, as they are my very favourite army. (I call her "Vera"!)
These were my initial thoughts on the codex...
HQs
Warlord Traits: I personally don't like the 1-use-only concept. I'd
rather have Stealth: Ruins all game rather than have it once for
everything within 12", for example. As always, they're too random to
build an army list around, so if you get one that fits, great, if not,
it doesn't really matter.
Eldrad: Functionally identical
to what he was before. Still redeploys units, still spams powers. Level
4 means he can chuck out 2x WC2 powers per turn with the option for
another single WC on average. However he can no longer cast the same
power twice, limiting his abuse of the new and improved powers available
to us. His melee skills also improved slightly, he now has a Force
Weapon at AP3.
Yriel: Essentially unchanged, Warlord Trait is nice for shuriken fans and that's about it.
Illic: Has Shrouded, but not Stealth, meaning the logical choice is
to put him with Rangers so they all get a +3 to their cover. Can get as
close to the enemy as he likes, but unlike Marbo has no demo charge
equivalent, so why would you put a sniper right up in the enemies face?
Ditto for his special rule allowing him to drag a unit of rangers to him
as well. Not only are you bringing them closer to the enemy (bad plan)
they can only snap shoot when they deep strike, and can't even run
afterwards. I simply don't understand the concept of what they were
trying to achieve with this rule. Has the potential to pull off some
stylish kills with a D-Cannon Rifle but overall I can't see him
displacing our Psykers as HQ choices.
Phoenix Lords:
Still expensive, but better. Some neat little rules (Karandras decking
most MCs by himself, Jain Zar granting a potential D6+7" run move to
Banshees etc) but overall not worth the points nor the opportunity cost
of skipping a Seer or Autarch.
Avatar: Buffed,
certainly. Also significantly more expensive. The addition of Fleet and a
wound is appreciated, but the loss of a point of Invul and an extra
45pts on the price tag is not. He can take two Exarch powers that are
worth the points - Fast Shot and Monster Hunter. I would never take
both, but one or the other would serve him well if you're looking to
spend your last 10pts in a list that includes him.
Autarchs:
Remains similar to last edition, being a very tool-boxey character.
Still functions as a useful buffstick to a Jetseer unit, and is even
better as a solo "cleaner" unit since Jetbikes are now 15pts and you can
strap stealth, shroud, hit and run, and rerolling failed cover saves on
for another 40pts.
Farseers: The default HQ choice now
they're ML3 for 100pts. All the runes are pointless, and it's really
personal choice on what lores you give him, because each does different
things. I need to test the Runes of Fate more, but I think all three
choices are very playable with the right supporting units.
Spiritseers:
Scoring Wraithguard. Nuff said. Can cast *2* Warlock powers per turn,
making them instantly the default choice for accompanying any beatstick
unit such as Wraithblades, foot-councils or Harlies.
Warlocks: Still expensive at 35pts and now have to take a Psychic
Test to cast, which at Ld8 is far from reliable. However a big unit on
Jetbikes is even more of a terror than it was previously - being able to
stack a multitude of buffs on themselves in combination with a Farseer,
while at the same time debuffing the enemy.
Troops
Dire Avengers: I *like* Dire
Avengers, so I will probably keep at least one unit of them in my army,
however they are definitely the losers of the Troop slot, even if it's
by a small margin. The pseudo-rending on all Shuriken based weaponry is
nice, but the loss of Bladestorm is a real hit against them. The
addition of the Counter-Attack rule to them is useful given that we can
no longer assault out of even stationary Serpents. However if they're
getting assaulted then having a few extra S3 AP- attacks isn't going to
alter the result in any meaningful fashion.
Guardians (Defender):
BS4!!! Finally! However a commensurate price increase - 1pt more per
model. And now the heavy weapon can actually be killed (why?). Rending
means they can actually be a significant threat to even MCs and Marines
with their shooting, which makes them non-ignorable in large numbers,
especially with Psychic Suppport. However they are still 12" range guns
so even with Battle Focus you're going to get 1 round of shooting and 1
round of overwatch before dissolving in melee. You can, however, now hit
things reliably with their heavy weapon (which is relentless so can run
and shoot).
Guardians (Storm): You'd think that WS4
would be the noticable improvement for these guys, but actually having
BS4 Melta in a unit other than Fire Dragons is more important. Even with
WS4 you're going to get panned by Marines (avoid the 15pt power weapons
- a waste of time) due to S3/T3 and a 5+ (although a Warlock can
potentially help on all of those counts). Not my personal favourite, but
having one unit in your army wouldn't hurt.
Jetbikes:
The very obvious winner of the Troops section. Twin linked near-rending
combined with an Assault phase move and Shuricannons with the sexy new
BS4 makes them far more killy than they were, and they also received a
5pt price drop. I'll take two squads, thanks. However bear in mind that
large units are very unwieldy - I'd stick to 6 with an optional Warlock
for some nice survival buffs - Shrouded and Jink saves? Nice.
Rangers:
Became cheaper, but lost their special AP1 rule, which is a shame,
because now they're BS4 SM scouts without the ML or 4+ armour. But they
have stealth natively, obviously still infiltrate, and serve an
identical role to last codex - backfield or wide flank scoring unit.
Continue to avoid combat or flamers/artillery and you'll be A-ok with
them.
Monday 24 June 2013
Monday 16 April 2012
Basics: Objective Placement
So,
Objectives can be tricky to place, as they rely on a variety of factors in both your army and that of your opponent. A few tips apply to every objective game:
Capture and Control
Otherwise known as "Oh, look ,we rolled a draw". The trick with this one is making sure you extend enough to reach out towards the opponent while also leaving enough behind to defend your own.
The key thing is not to fight on your own objective. If you're embroiled in a swarming melee on top of your objective with transports and stuff cluttered around the outside it can be very hard to claim it without contesting enemy units. Fight a good 12" away from it if you can - use blocking techniques and terrain to control enemy movement to the best of your ability.
Also try to shut down enemy mobility as early as you can - transports, skimmers and jetbikes especially. With that in mind, the best placement for your own objective is generally at the back of your firebase. If you have a nice ruin or hill in your deployment zone, put the Obj at the back of it. Your fire support elements plus at least one Troop choice can then sit on that nice piece of cover with decent sight lines. If no such terrain piece is available, then make the most of available cover or use your own vehicle hulls to give you cover saves on things like Broadsides or Devastators.
The REST of your army should then make it their mission to control the middle of the board until about turn 4. Note that you should not grind mindlessly towards his objective every turn - you should reach the middle of the table, occupy it, put out some damage, and THEN go for it one or two turns later. This confers several advantages:
Seize Ground
D3+2 Objectives, with the common Tournament pre-set being the maximum of 5. If 3 is rolled, it basically becomes Capture and Control except normally one player has two Objs in his deployment zone instead of one. The same principles apply for both 4 and 5 Obj games, which are as follows:
First, ask yourself a couple of questions in addition to the ones at the start of this post.
Rock armies want the objectives to be bunched up as much as possible, because it means they can march their badass units into the middle of them and sit there, daring anyone to come close enough to assault. A Land Raider claims two objectives if they are 12" apart and it sits in the middle. 10 Terminators can easily claim 3 if they are placed in a 12" triangle. The unit doesn't even have to be Troops, they just have to deter enemy units and assert control over the area.
N.B. Even though you deploy objectives before the roll to choose sides, it is extremely common for someone to pick the side they are stood on in casual games (and even in tournaments), and deploy objectives and choose zones appropriately. While it *should* be impossible to determine which zone your opponent will choose before the roll itself, it is often rather easy to do so. Whether you choose to factor this into your thinking or not is entirely up to you.
Here is an example of how you might place the Objs if you have a rock army with shooting support:
 Assuming you are planning to be in the lower zone/bottom left quarter, this gives you a nice close triad of objectives that your opponent must advance towards if they want to win or even draw. Your fire support can take its toll as they close in, and then your rock sweeps over the survivors.
Here is an example of how you might place the Objs if you're a pure melee army:

Again, assuming you are in the bottom/left it means you can advance with your entire army, with no need for any kind of back-field objective holders. You run as fast as you can at the enemy and essentially play as though you're going for Kill Points - wiping him off the table if possible. Failing that, you should have penned him in enough with your rock unit(s) to be able to splinter a scoring unit off towards one of the outer objectives, and contest the rest. If he splits his army it just makes killing him that much easier, and you roll over the trio of Objs with your rock and your scoring units.
MSU armies play entirely differently. Regardless of who deploys where or whether you're ranged or melee, you will most of the time be aiming for something like this:
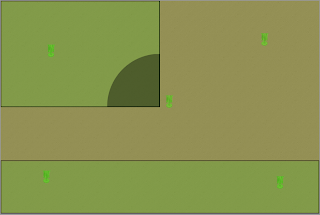 A setup like this gives you maximum flexibility as to where you fight and how you commit your units. An army with 12 units can happily send one off to each objective, either to claim or contest as needed. An army with 6 units is much less happy about doing so.
Commonly it is the objectives deployed closest to the centre of the board where the fighting takes place, so that is where you should concentrate most of your army, sending a few other units out to the more remote objectives, forcing your opponent to split off more of his army to do so. If your opponent is forced to send a 200pt unit after your 100pt unit, that's ideal for you, because every unit sent out that way significantly weakens his centre, while yours barely notices the loss.
Space marines are generally good at this, as they can combat squad as needed, turning 3 scoring units into 6. Park 4 marines plus a missile launcher on each corner objective while the Sergeant and Flamer/Melta runs forward with the squads Razorback/Rhino at the opposing corner means 400pts of units can control 4 Objectives if left alone while the big scrap happens in the middle. Obviously one or more of your units will get nobbed, but if it means your opponent is sending bigger and scarier units to do it, or you're taking firepower away from your better units then that's all gravy.
A lot of choices you make will depend on both terrain and your opponent, so I'm afraid this is only the broad strokes of how I normally place objectives, the details aren't obvious until you are actually stood next to your table!
Objectives can be tricky to place, as they rely on a variety of factors in both your army and that of your opponent. A few tips apply to every objective game:
- Can he Outflank? If so, consider placing your Objs closer to the midline of the table.
- Can he Deep Strike? If so, remember the castling principles outlined in previous posts and consider placing your Objs near impassable terrain or board edges. Even if you kill the embarked unit in a pod, killing a 12/12/12 vehicle is a headache you should avoid if you can, by making sure he can't drop the pod itself within contesting distance.
- Are you a shooting army? Put the objectives that are NOT in your immediate deployment zone in the open, so you can shoot freely at any units trying to take them. Objs in your zone should be in cover so you take minimum return fire, and can strike before attackers who don't have Frags.
- Are you a combat army? Put all of the objectives in/near cover (you have Frag Grenades, right?) so when you win combats, you don't get shot up too much by the enemy. The exception to this is cover big enough to hide vehicles - you don't want to cripple your own fire support by giving enemy transports/tanks free cover saves.
Capture and Control
Otherwise known as "Oh, look ,we rolled a draw". The trick with this one is making sure you extend enough to reach out towards the opponent while also leaving enough behind to defend your own.
The key thing is not to fight on your own objective. If you're embroiled in a swarming melee on top of your objective with transports and stuff cluttered around the outside it can be very hard to claim it without contesting enemy units. Fight a good 12" away from it if you can - use blocking techniques and terrain to control enemy movement to the best of your ability.
Also try to shut down enemy mobility as early as you can - transports, skimmers and jetbikes especially. With that in mind, the best placement for your own objective is generally at the back of your firebase. If you have a nice ruin or hill in your deployment zone, put the Obj at the back of it. Your fire support elements plus at least one Troop choice can then sit on that nice piece of cover with decent sight lines. If no such terrain piece is available, then make the most of available cover or use your own vehicle hulls to give you cover saves on things like Broadsides or Devastators.
The REST of your army should then make it their mission to control the middle of the board until about turn 4. Note that you should not grind mindlessly towards his objective every turn - you should reach the middle of the table, occupy it, put out some damage, and THEN go for it one or two turns later. This confers several advantages:
- You can turn around and go back if you really need to with one or more units, such as when your home Troops choice has their transport explode, fail their morale, and flee off the table.
- You can react much easier to your opponents moves with more of your units. If you run at him with everything then it's quite easy for him to flank you with a fast unit or two that can cross the table and reach your objective.
- You are not moving so fast, so you can put out more firepower - moving 6" instead of 12", staying stationary for a turn or two, not having to run, etc. In the long run this will mean you have a better chance of controlling his objective and defending your own because he will have less resources available to him to do the same to you.
- It means most of the combats will happen mid-table instead of in someones deployment zone, which we have already established is a bad thing.
Seize Ground
D3+2 Objectives, with the common Tournament pre-set being the maximum of 5. If 3 is rolled, it basically becomes Capture and Control except normally one player has two Objs in his deployment zone instead of one. The same principles apply for both 4 and 5 Obj games, which are as follows:
First, ask yourself a couple of questions in addition to the ones at the start of this post.
- Am I/my opponent a "Rock" army? The definition of a Rock army is a list that relies on one or two super-units to do most of their heavy lifting with regards to killing the enemy. 10 Nobz + Warboss + Toys fit into this category, as do large squads of Terminators, Paladins, Multiple Land Raiders, etc etc. If a unit (including their transport if they have one) cost more than 500pts, it's probably a Rock. Generally melee orientated and very survivable.
- Am I/my opponent an MSU army? MSU stands for "Many Small Units" and is generally the antithesis of Rock lists. 5 man squads in Razorbacks (or the equivalent) or minimum sized units with heavy/special weapons generally provide the building blocks of MSU. Space Wolves, Grey Knights and Necrons are the worst offenders, although any army can do it if they try.
Rock armies want the objectives to be bunched up as much as possible, because it means they can march their badass units into the middle of them and sit there, daring anyone to come close enough to assault. A Land Raider claims two objectives if they are 12" apart and it sits in the middle. 10 Terminators can easily claim 3 if they are placed in a 12" triangle. The unit doesn't even have to be Troops, they just have to deter enemy units and assert control over the area.
N.B. Even though you deploy objectives before the roll to choose sides, it is extremely common for someone to pick the side they are stood on in casual games (and even in tournaments), and deploy objectives and choose zones appropriately. While it *should* be impossible to determine which zone your opponent will choose before the roll itself, it is often rather easy to do so. Whether you choose to factor this into your thinking or not is entirely up to you.
Here is an example of how you might place the Objs if you have a rock army with shooting support:
Here is an example of how you might place the Objs if you're a pure melee army:
Again, assuming you are in the bottom/left it means you can advance with your entire army, with no need for any kind of back-field objective holders. You run as fast as you can at the enemy and essentially play as though you're going for Kill Points - wiping him off the table if possible. Failing that, you should have penned him in enough with your rock unit(s) to be able to splinter a scoring unit off towards one of the outer objectives, and contest the rest. If he splits his army it just makes killing him that much easier, and you roll over the trio of Objs with your rock and your scoring units.
MSU armies play entirely differently. Regardless of who deploys where or whether you're ranged or melee, you will most of the time be aiming for something like this:
Commonly it is the objectives deployed closest to the centre of the board where the fighting takes place, so that is where you should concentrate most of your army, sending a few other units out to the more remote objectives, forcing your opponent to split off more of his army to do so. If your opponent is forced to send a 200pt unit after your 100pt unit, that's ideal for you, because every unit sent out that way significantly weakens his centre, while yours barely notices the loss.
Space marines are generally good at this, as they can combat squad as needed, turning 3 scoring units into 6. Park 4 marines plus a missile launcher on each corner objective while the Sergeant and Flamer/Melta runs forward with the squads Razorback/Rhino at the opposing corner means 400pts of units can control 4 Objectives if left alone while the big scrap happens in the middle. Obviously one or more of your units will get nobbed, but if it means your opponent is sending bigger and scarier units to do it, or you're taking firepower away from your better units then that's all gravy.
A lot of choices you make will depend on both terrain and your opponent, so I'm afraid this is only the broad strokes of how I normally place objectives, the details aren't obvious until you are actually stood next to your table!
Basics: Drop Pod Defence 2
So,
Previously we covered how to castle up against a single drop pod/deep striker with meltaguns. Now we examine how to defend against Multimeltas and Drop Pod armies (i.e. any army that drops three or more pods on turn 1).
Multimeltas
At once both more and less threatening that meltaguns. More threatening as they are much harder to block off with sight lines and distances, but less threatening because there is generally only 1 of them on a BS4 platform. Here's a few numbers for a half range Multimelta hitting a Land Raider, rounded to the nearest percentage point:
Chance to hit: 66%
Chance to Glance: 14%
Chance to Penetrate: 58%
Put another way, that's a 33% chance to miss, a 28% chance not to cause a damaging hit, and a 33% chance to deal no critical damage even if they pen. Add in a cover save and you cut the odds of a seriously damaging hit down to 33%. That's not good odds for your opponent - the approximate equivalent to rolling 4 saves for a single marine and needing him to live.
What this means is that organising your deployment around total denial of a single MM shot is inefficient at best, foolhardy at worst. Your opponent has managed to dictate your entire deployment based around the threat of a single unit, which he is probably more than happy with. What I would suggest instead is that you focus around gaining a cover save from as many potential drop sites as possible, reducing the risk of being destroyed by a considerable amount. If you manage that, maybe with the help of one or two other units, you can continue to deploy as normal with the rest of your army. It is also important to consider that your Land Raider (or whatever) still needs to do it's job, so if the choice is between doing nothing all game by being sat in your deployment zone, or risking a single MM shot, it is often worth taking the risk, especially if you have smoke available.
Drop Pod Armies
Not often seen because they are rather easy to nullify with one basic tactic: Don't deploy. If you choose not to deploy and hold everything in reserve, it means he basically has two choices: Deploy along your table edge while trying to support each other, or deploy in the middle of the table in a "Pod Bunker".
If he opts for the former, simply roll for your tanks first, choose the flank with the least units on it, and drive on that way. If any infantry are in the way then Tank shock them to clear a space for any infantry units you have. This will put half of your army on one flank, versus one or two drop pods plus their squads. Shouldn't be tricky for you. Your reserves will arrive at an even rate, so you should be able to keep your head start for the rest of the game.
If he goes for the "Pod bunker" approach, then drive on and use your superior mobility to encircle, outmaneuver and outgun the enemy. His pods have Storm bolters. Your tanks have heavy weapons. You can move 12", disembark and shoot. He can move 6" and shoot/assault or move 6" + D6 and do neither. Again, this should not be a tricky situation for you. The only difficulty is clearing pods off objectives, but if you brought appropriate amounts of Power Fists, Meltabombs, Meltaguns and so on, you should be able to claim at least 1 or 2, and contest the rest.
Basics: Drop Pod Defence 1
So,
Sometimes a Space Marine player will have taken a single drop pod with his army, commonly with some kind of Melta unit inside. Sternguard are often the unit of choice, either 5 men with combi meltas or even 10, who then combat squad out of the pod and try to nuke two targets. Other common choices are "vanilla" dreadnoughts with Multimeltas (MM), Venerable Dreads for the BS5, or Ironclads for the AV13. Blood Angels players also like to drop 5-10x Jump Infantry with 2-3x Meltaguns on turn 2, and sometimes Furioso Dreads as well. There is a basic deployment technique called "Castling" or "Bunkering" that can severely limit the effectiveness of these units.
Let's refresh our memory of the rules for Deep Striking:
1. A mishap occurs if the Deep Striking unit does any of the following:
And specifically for Drop Pods:
1. Half of the Drop Pods (rounding up) MUST enter play at the beginning of the controllers Turn 1, and the others arrive from reserve as normal, i.e. on a 4+ turn 2, 3+ turn 3 etc. This means you can often make a good guess what is coming and when.
2. A Drop Pod that scatters and consequently lands on an enemy model or impassable terrain will have the scatter reduced by the minimum number of inches required to prevent a mishap. This means that they must choose a legal landing site in order to prevent a mishap - reducing the scatter distance means exactly that, not "put it anywhere you like close to the target point so you're not touching anything". If they choose an unsafe landing point and either Hit or scatter insufficiently, they will mishap. They also mishap off table edges and land in difficult terrain (counting it as dangerous) as normal.
In this first post we will assume the enemy is dropping with normal meltaguns (6" for 2D6 Pen).
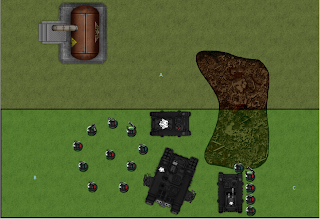
In this picture we have 10 tac marines, a Rhino, a Razorback with 5 more Tac marines and a Land Raider filled with Terminators. Obviously the Land Raider is the juiciest prize for the opponent, because those termies look a lot less scary walking 6" a turn instead of 12" + 2" disembark + Assault ramp.
The big Tac squad are doing the job of all non-essential infantry in these circumstances, which is to fill out as much space as they can. This restricts placement on the left to landing site B - which is outside of 6" from the Raider, and also puts the pod at severe risk of scattering off a table edge. An important aspect of their positioning is that they are all within 8" of the hatches of the Rhino, which means they can all embark next turn once the Pod threat is gone.
The Rhino is blocking access to the Land Raider, and providing it with a cover save if they try to drop in near landing site A. Of course the Rhino itself is vulnerable, but if they want to waste 2 KPs and over 100pts trying to kill a 35pt Rhino, they're welcome.
The Razorback is blocking access from landing zone C, and the disembarked squad are providing a cover save to their Razorback as well, reducing the risk of losing it.
The brown terrain blob is impassable (I know one of the Razorback squad guys is standing on it, my mistake!) so the pod cannot land on it, but can land past it with clear line of sight to the Raider, but at this point they are out of 6" so will need 6s to glance.
With a little bit of thought and careful placement, your opponent now has nowhere to drop so that he can threaten the Raider effectively, and you are only slightly inconvenienced, because both squads can embark on their vehicles and move off next turn, leaving the path free for your Raider to advance/assault.
Sometimes a Space Marine player will have taken a single drop pod with his army, commonly with some kind of Melta unit inside. Sternguard are often the unit of choice, either 5 men with combi meltas or even 10, who then combat squad out of the pod and try to nuke two targets. Other common choices are "vanilla" dreadnoughts with Multimeltas (MM), Venerable Dreads for the BS5, or Ironclads for the AV13. Blood Angels players also like to drop 5-10x Jump Infantry with 2-3x Meltaguns on turn 2, and sometimes Furioso Dreads as well. There is a basic deployment technique called "Castling" or "Bunkering" that can severely limit the effectiveness of these units.
Let's refresh our memory of the rules for Deep Striking:
1. A mishap occurs if the Deep Striking unit does any of the following:
- They land fully or partially off the table
- They land within 1" of an enemy model
- They land on impassable terrain
- They land on top of a friendly model
And specifically for Drop Pods:
1. Half of the Drop Pods (rounding up) MUST enter play at the beginning of the controllers Turn 1, and the others arrive from reserve as normal, i.e. on a 4+ turn 2, 3+ turn 3 etc. This means you can often make a good guess what is coming and when.
2. A Drop Pod that scatters and consequently lands on an enemy model or impassable terrain will have the scatter reduced by the minimum number of inches required to prevent a mishap. This means that they must choose a legal landing site in order to prevent a mishap - reducing the scatter distance means exactly that, not "put it anywhere you like close to the target point so you're not touching anything". If they choose an unsafe landing point and either Hit or scatter insufficiently, they will mishap. They also mishap off table edges and land in difficult terrain (counting it as dangerous) as normal.
In this first post we will assume the enemy is dropping with normal meltaguns (6" for 2D6 Pen).
In this picture we have 10 tac marines, a Rhino, a Razorback with 5 more Tac marines and a Land Raider filled with Terminators. Obviously the Land Raider is the juiciest prize for the opponent, because those termies look a lot less scary walking 6" a turn instead of 12" + 2" disembark + Assault ramp.
The big Tac squad are doing the job of all non-essential infantry in these circumstances, which is to fill out as much space as they can. This restricts placement on the left to landing site B - which is outside of 6" from the Raider, and also puts the pod at severe risk of scattering off a table edge. An important aspect of their positioning is that they are all within 8" of the hatches of the Rhino, which means they can all embark next turn once the Pod threat is gone.
The Rhino is blocking access to the Land Raider, and providing it with a cover save if they try to drop in near landing site A. Of course the Rhino itself is vulnerable, but if they want to waste 2 KPs and over 100pts trying to kill a 35pt Rhino, they're welcome.
The Razorback is blocking access from landing zone C, and the disembarked squad are providing a cover save to their Razorback as well, reducing the risk of losing it.
The brown terrain blob is impassable (I know one of the Razorback squad guys is standing on it, my mistake!) so the pod cannot land on it, but can land past it with clear line of sight to the Raider, but at this point they are out of 6" so will need 6s to glance.
With a little bit of thought and careful placement, your opponent now has nowhere to drop so that he can threaten the Raider effectively, and you are only slightly inconvenienced, because both squads can embark on their vehicles and move off next turn, leaving the path free for your Raider to advance/assault.
Friday 13 April 2012
Basics: Blocking 2
So,
Last post was about blocking infantry units with both tanks and other infantry units. Here is an example of blocking vehicles with vehicles.
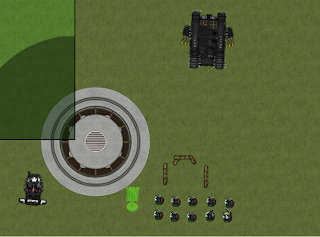
The Chaos Land Raider is in position to next turn move forward 12", disembark, and assault the Tac squad on the objective on their turn 5. This is a bad thing. The Land Speeder has a Multimelta, but it is critically important that the Terminators do NOT assault next turn, which means the Marine player cannot leave it to dice (33% chance to miss, 28% chance to fail to cause damage, only about 28% chance to destroy or immobilise). So this is what he does instead.
 Remember that the turn sequence is Move, Shoot, Assault. This means the Chaos player cannot get rid of the Speeder until AFTER the movement phase, unless he chooses to Ram - in which case he will be inflicting a S5 hit. We can live with that. Ramming is the reason we want to be as close as possible to the hull of the enemy, because if we were 4" away instead of 1", he'd get a S6 hit instead of S5, and obviously the further away you are, the more likely you are to die. So the Chaos player is force to attempt this instead:
 He has used all of his 12" movement in order to move around the Speeder. In situations like this it is critical that you monitor the movement closely and remember a few things:
1. He may not pass within 1" of your hull at any time
2. Vehicles turn by pivoting on their center. This means he needs to move in straight lines, making multiple turns, not just moving in a curve like we normally do because we're lazy. He needs to turn, move, turn, move, turn, move to get past you.
3. You can actually sometimes pin long vehicles like Land Raiders this way up against impassable terrain or other units, by denying them the ability to pivot while remaining 1" away from you at all times.
As it turns out, the Terminators are just out of assault range, and so are forced to shoot a bit with their combi-bolters. Even if they kill a few, the Marine player can simply remove models that are furthest away from the objective - if he had been assaulted, he would have been forced to pile in, potentially dragging him away from it, even if he had survived the combat.
Last post was about blocking infantry units with both tanks and other infantry units. Here is an example of blocking vehicles with vehicles.
The Chaos Land Raider is in position to next turn move forward 12", disembark, and assault the Tac squad on the objective on their turn 5. This is a bad thing. The Land Speeder has a Multimelta, but it is critically important that the Terminators do NOT assault next turn, which means the Marine player cannot leave it to dice (33% chance to miss, 28% chance to fail to cause damage, only about 28% chance to destroy or immobilise). So this is what he does instead.
1. He may not pass within 1" of your hull at any time
2. Vehicles turn by pivoting on their center. This means he needs to move in straight lines, making multiple turns, not just moving in a curve like we normally do because we're lazy. He needs to turn, move, turn, move, turn, move to get past you.
3. You can actually sometimes pin long vehicles like Land Raiders this way up against impassable terrain or other units, by denying them the ability to pivot while remaining 1" away from you at all times.
As it turns out, the Terminators are just out of assault range, and so are forced to shoot a bit with their combi-bolters. Even if they kill a few, the Marine player can simply remove models that are furthest away from the objective - if he had been assaulted, he would have been forced to pile in, potentially dragging him away from it, even if he had survived the combat.
Basics: Blocking 1
So,
We begin our look at basic tactics for 40k with blocking. This is the act of placing your units in a position where they effectively prevent an enemy unit(s) from accomplishing their objective. In this example, Khorne Beserkers are rushing towards some Devastators in order to chop them up. Fortunately the Devs have some mates nearby who can help, letting them continue to rain firepower down on other targets that are more important. Here's the scenario, let's call it turn 2:

So as we can see, the Zerkers basically have a clear run to the Devs, and the Devs are never going to kill all of them before they hit, never mind the fact that they should be shooting tanks instead. Here's how the Raven Guard player deals with them with his turn 3 movement.

The Rhino has moved 12" in order to block the Zerkers. The Zerkers have a choice of either ignoring the Rhino and moving through the difficult terrain, slowing them down, or of assaulting the Rhino and trying to destroy it.

The Zerkers have chosen to try the difficult terrain in their turn 3, but roll badly, and end up not moving very far. The Zerker player then chooses to assault the Rhino in order to garner some extra forward movement.

The 5 marines in the Rhino pop out when it becomes wrecked (something on the order of 40 S5 attacks will do that, even needing 6s to hit) and pass their pinning check.

On turn 4, they move out into a line and shoot the Zerkers a bit, but
don't kill anything. They do not assault, because the odds are
reasonable that they could lose and run/die in a single round of combat,
freeing the Zerkers up to assault the Devs turn 4. On the Zerker turn 4, they assault the Marines, because otherwise they
have very little choice in terms of how they are going to reach the
Devs.

At the start of turn 5, the Zerkers have wiped out the Marines and consolidated forwards at the end of their turn 4. The Devs have the choice of either firing their heavy weapons one last time at something elsewhere on the table, shooting their heavy weapons at the Zerkers and get charged, or pistol the Zerkers and charge themselves, hoping to not die in one round of combat. Each choice has it's pros and cons, and depends on whether there are any strategically important targets in line of sight, and what the assaulting unit is. If it was Guardsmen, pistols and charge would probably be more effective than 4 lascannon shots, if it was terminators then the lascannons would probably help more. And this is the final result:

The Devs decided to pistol and charge, because this way they deny the Zerkers Furious Charge, and the +1A for assaulting, which means they have a decent chance of locking them up for a turn or so.
Space Marine Gains:
Turn 3 shooting with 4 heavy weapons
Turn 4 shooting with 4 heavy weapons
Tying up an elite combat unit for two full game turns, if not 3
Space Marine Losses:
Two kill points
As the Space Marine player, it is your job to weigh up the pros and the cons of blocking, and decide whether it is worth sacrificing your own units in order to simply delay an enemy unit. This will differ from unit to unit, for example versus 10 Paladins, the answer will be "Hell yes" but versus 10 Ork Boyz the answer may well be "Hell no". One of the important skills of being a general is what to kill, what to avoid, and what to delay.
We begin our look at basic tactics for 40k with blocking. This is the act of placing your units in a position where they effectively prevent an enemy unit(s) from accomplishing their objective. In this example, Khorne Beserkers are rushing towards some Devastators in order to chop them up. Fortunately the Devs have some mates nearby who can help, letting them continue to rain firepower down on other targets that are more important. Here's the scenario, let's call it turn 2:
The Zerkers have chosen to try the difficult terrain in their turn 3, but roll badly, and end up not moving very far. The Zerker player then chooses to assault the Rhino in order to garner some extra forward movement.
The 5 marines in the Rhino pop out when it becomes wrecked (something on the order of 40 S5 attacks will do that, even needing 6s to hit) and pass their pinning check.
At the start of turn 5, the Zerkers have wiped out the Marines and consolidated forwards at the end of their turn 4. The Devs have the choice of either firing their heavy weapons one last time at something elsewhere on the table, shooting their heavy weapons at the Zerkers and get charged, or pistol the Zerkers and charge themselves, hoping to not die in one round of combat. Each choice has it's pros and cons, and depends on whether there are any strategically important targets in line of sight, and what the assaulting unit is. If it was Guardsmen, pistols and charge would probably be more effective than 4 lascannon shots, if it was terminators then the lascannons would probably help more. And this is the final result:
The Devs decided to pistol and charge, because this way they deny the Zerkers Furious Charge, and the +1A for assaulting, which means they have a decent chance of locking them up for a turn or so.
Space Marine Gains:
Turn 3 shooting with 4 heavy weapons
Turn 4 shooting with 4 heavy weapons
Tying up an elite combat unit for two full game turns, if not 3
Space Marine Losses:
Two kill points
As the Space Marine player, it is your job to weigh up the pros and the cons of blocking, and decide whether it is worth sacrificing your own units in order to simply delay an enemy unit. This will differ from unit to unit, for example versus 10 Paladins, the answer will be "Hell yes" but versus 10 Ork Boyz the answer may well be "Hell no". One of the important skills of being a general is what to kill, what to avoid, and what to delay.
First Post!
So,
First post in a shiny new blog. Yay.

This is mainly to see if it works, and how it looks.
First post in a shiny new blog. Yay.
This is mainly to see if it works, and how it looks.
Subscribe to:
Posts (Atom)